
OpenVPNをインストールしたけど・・・この後どうすればいいのだろう・・
logwのサーバーにOpenVPNをインストールしました。結果的には成功?したのですがちょっとこのあとどうしたらいいのかわからないので設定の備忘録として残しておきます。
サーバー環境
- サーバーOS:CentOS6.3
- IPアドレス:49.212.167.84
- ソフトウェア:OpenVPN
クライアント環境
- Windows7 64bit
- クライアントソフトウェア:OpenVPN
インストール方法
インストール方法としては、「yum」を使ってインストールしたいと思います。標準のリポジトリには用意されていないので「EPELリポジトリ」をインストールします。
EPELリポジトリの導入方法
[c]
# yum -y install yum-plugin-priorities ←vyum-prioritiesインストール
[/c]
[c]
# vi /etc/yum.repos.d/CentOS-Base.repo ← 標準リポジトリ設定ファイル編集
[/c]
[c]
[base]
name=CentOS-$releasever - Base
mirrorlist=http://mirrorlist.centos.org/?release=$releasever&arch=$basearch&repo=os
#baseurl=http://mirror.centos.org/centos/$releasever/os/$basearch/
gpgcheck=1
gpgkey=http://mirror.centos.org/centos/RPM-GPG-KEY-CentOS-6
priority=1 ← 追加
#released updates
[updates]
name=CentOS-$releasever - Updates
mirrorlist=http://mirrorlist.centos.org/?release=$releasever&arch=$basearch&repo=updates
#baseurl=http://mirror.centos.org/centos/$releasever/updates/$basearch/
gpgcheck=1
gpgkey=http://mirror.centos.org/centos/RPM-GPG-KEY-CentOS-6
priority=1 ← 追加
#additional packages that may be useful
[extras]
name=CentOS-$releasever - Extras
mirrorlist=http://mirrorlist.centos.org/?release=$releasever&arch=$basearch&repo=extras
#baseurl=http://mirror.centos.org/centos/$releasever/extras/$basearch/
gpgcheck=1
gpgkey=http://mirror.centos.org/centos/RPM-GPG-KEY-CentOS-6
priority=1 ← 追加
[/c]
EPELリポジトリ導入
[c]
# rpm -ivh http://ftp.riken.jp/Linux/fedora/epel/6/i386/epel-release-6-5.noarch.rpm ← EPELリポジトリインストール
[/c]
[c]
# yum -y update epel-release ← epel-releaseアップデート
[/c]
OpenVPNのインストール
OpenVPNをインストールしたいと思います。http://centossrv.com/openvpn.shtmlを参考にしてます。
[c]
# cp -r /usr/share/openvpn/easy-rsa/2.0/ /etc/openvpn/easy-rsa ← 証明書/鍵作成用ディレクトリをコピー
# cd /etc/openvpn/easy-rsa/ ← 証明書/鍵作成用ディレクトリへ移動
# chmod +x * ← 各スクリプトへ実行権限付加
[/c]
whichopensslcnf編集
[c]
elif $OPENSSL version | grep -E "1\.0\.([[:digit:]][[:alnum:]])" > /dev/null; then をバグ対策のため以下のようにします。
elif $OPENSSL version | grep -E "1\.0\.([[:digit:]][[:alnum:]]?)" > /dev/null; then
[/c]
↓ 編集後はこんな感じになります。
[c]
# vi whichopensslcnf
#!/bin/sh
cnf="$1/openssl.cnf"
if [ "$OPENSSL" ]; then
if $OPENSSL version | grep -E "0\.9\.6[[:alnum:]]" > /dev/null; then
cnf="$1/openssl-0.9.6.cnf"
elif $OPENSSL version | grep -E "0\.9\.8[[:alnum:]]" > /dev/null; then
cnf="$1/openssl-0.9.8.cnf"
elif $OPENSSL version | grep -E "1\.0\.([[:digit:]][[:alnum:]]?)" > /dev/null; then
cnf="$1/openssl-1.0.0.cnf"
else
cnf="$1/openssl.cnf"
fi
fi
echo $cnf
if [ ! -r $cnf ]; then
echo "**************************************************************" >&2
echo " No $cnf file could be found" >&2
echo " Further invocations will fail" >&2
echo "**************************************************************" >&2
fi
exit 0
[/c]
証明書/鍵作成用環境変数設定ファイル編集
[c]
# vi vars
export KEY_COUNTRY="US"
export KEY_PROVINCE="CA"
export KEY_CITY="SanFrancisco"
export KEY_ORG="Fort-Funston"
export KEY_EMAIL="me@myhost.mydomain"
↓
export KEY_COUNTRY="JP" ← サーバー所在地(国名)を指定(例:JP)
export KEY_PROVINCE="Tokyo" ← サーバー所在地(都道府県名)を指定(例:Tokyo)
export KEY_CITY="Shibuya" ← サーバー所在地(市区町村名)を指定(例:Shibuya)
export KEY_ORG="logw.jp" ← サーバー名を指定
export KEY_EMAIL="contact@logw.jp" ← サーバー管理者メールアドレスを指定
[/c]
証明書/鍵作成用環境変数設定ファイル内容をシステムに反映
[c]
# source vars
NOTE: If you run ./clean-all, I will be doing a rm -rf on /etc/openvpn/easy-rsa/keys
[/c]
証明書/鍵作成先ディレクトリ初期化
※OpenVPNインストール後最初の1回のみ
[c]
# ./clean-all
# ./build-ca ← CA証明書・秘密鍵作成
Generating a 1024 bit RSA private key
.......++++++
......++++++
writing new private key to 'ca.key'
-----
You are about to be asked to enter information that will be incorporated
into your certificate request.
What you are about to enter is what is called a Distinguished Name or a DN.
There are quite a few fields but you can leave some blank
For some fields there will be a default value,
If you enter '.', the field will be left blank.
-----
Country Name (2 letter code) [JP]: ← 空ENTER
State or Province Name (full name) [Kanagawa]: ← 空ENTER
Locality Name (eg, city) [Kawasaki]: ← 空ENTER
Organization Name (eg, company) [centossrv.com]: ← 空ENTER
Organizational Unit Name (eg, section) []: ← 空ENTER
Common Name (eg, your name or your server's hostname) [centossrv.com CA]: ← 空ENTER
Email Address [root@centossrv.com]: ← 空ENTER
# cp keys/ca.crt /etc/openvpn/ ← CA証明書をOpenVPN設定ファイル格納ディレクトリへコピー
[/c]
サーバー証明書・秘密鍵作成
[c]
# ./build-key-server server
Generating a 1024 bit RSA private key
.......++++++
.++++++
writing new private key to 'server.key'
-----
You are about to be asked to enter information that will be incorporated
into your certificate request.
What you are about to enter is what is called a Distinguished Name or a DN.
There are quite a few fields but you can leave some blank
For some fields there will be a default value,
If you enter '.', the field will be left blank.
-----
Country Name (2 letter code) [JP]: ← 空ENTER
State or Province Name (full name) [Kanagawa]: ← 空ENTER
Locality Name (eg, city) [Kawasaki]: ← 空ENTER
Organization Name (eg, company) [centossrv.com]: ← 空ENTER
Organizational Unit Name (eg, section) []: ← 空ENTER
Common Name (eg, your name or your server's hostname) [server]: ← 空ENTER
Email Address [root@centossrv.com]: ← 空ENTER
Please enter the following 'extra' attributes
to be sent with your certificate request
A challenge password []: ← 空ENTER
An optional company name []: ← 空ENTER
Using configuration from /usr/share/openvpn/easy-rsa/2.0/openssl.cnf
Check that the request matches the signature
Signature ok
The Subject's Distinguished Name is as follows
countryName :PRINTABLE:'JP'
stateOrProvinceName :PRINTABLE:'Tokyo'
localityName :PRINTABLE:'Shibuya'
organizationName :PRINTABLE:'logw.jp'
commonName :PRINTABLE:'server'
emailAddress :IA5STRING:'contact@logw.jp'
Certificate is to be certified until Nov 15 13:36:57 2016 GMT (3650 days)
Sign the certificate? [y/n]:y ← y応答
1 out of 1 certificate requests certified, commit? [y/n]y ← y応答
Write out database with 1 new entries
Data Base Updated
[root@centos easy-rsa]# cp keys/server.crt /etc/openvpn/ ← サーバー証明書をOpenVPN設定ファイル格納ディレクトリへコピー
[root@centos easy-rsa]# cp keys/server.key /etc/openvpn/ ← サーバー秘密鍵をOpenVPN設定ファイル格納ディレクトリへコピー
[/c]
DH(Diffie Hellman)パラメータ作成
[c]
# ./build-dh ← DHパラメータ作成
Generating DH parameters, 1024 bit long safe prime, generator 2
This is going to take a long time
※時間がかかる
# cp keys/dh1024.pem /etc/openvpn/ ← DHパラメータをOpenVPN設定ファイル格納ディレクトリへコピー
[/c]
証明書廃止リスト作成
[c]
# ./build-key dmy ← ダミーのクライアント証明書作成
Generating a 1024 bit RSA private key
..++++++
...............................................++++++
writing new private key to 'dmy.key'
-----
You are about to be asked to enter information that will be incorporated
into your certificate request.
What you are about to enter is what is called a Distinguished Name or a DN.
There are quite a few fields but you can leave some blank
For some fields there will be a default value,
If you enter '.', the field will be left blank.
-----
Country Name (2 letter code) [JP]: ← 空ENTER
State or Province Name (full name) [Kanagawa]: ← 空ENTER
Locality Name (eg, city) [Kawasaki]: ← 空ENTER
Organization Name (eg, company) [centossrv.com]: ← 空ENTER
Organizational Unit Name (eg, section) []: ← 空ENTER
Common Name (eg, your name or your server's hostname) [dmy]: ← 空ENTER
Email Address [root@centossrv.com]: ← 空ENTER
Please enter the following 'extra' attributes
to be sent with your certificate request
A challenge password []: ← 空ENTER
An optional company name []: ← 空ENTER
Using configuration from /etc/openvpn/easy-rsa/openssl.cnf
Check that the request matches the signature
Signature ok
The Subject's Distinguished Name is as follows
countryName :PRINTABLE:'JP'
stateOrProvinceName :PRINTABLE:'Tokyo'
localityName :PRINTABLE:'Shibuya'
organizationName :PRINTABLE:'logw.jp'
commonName :PRINTABLE:'dmy'
emailAddress :IA5STRING:'contact@logw.jp'
Certificate is to be certified until Dec 2 07:48:44 2016 GMT (3650 days)
Sign the certificate? [y/n]:y ← y応答
1 out of 1 certificate requests certified, commit? [y/n]y ← y応答
Write out database with 1 new entries
Data Base Updated
# vi openssl-1.0.0.cnf
#[ pkcs11_section ] ← 行頭に#を追加してコメントアウト
#engine_id = pkcs11 ← 行頭に#を追加してコメントアウト
#dynamic_path = /usr/lib/engines/engine_pkcs11.so ← 行頭に#を追加してコメントアウト
#MODULE_PATH = $ENV::PKCS11_MODULE_PATH ← 行頭に#を追加してコメントアウト
#PIN = $ENV::PKCS11_PIN ← 行頭に#を追加してコメントアウト
#init = 0 ← 行頭に#を追加してコメントアウト
※上記はクライアント証明書廃止時に以下のようなエラーメッセージが出力されてしまうことの対処
Using configuration from /etc/openvpn/easy-rsa/openssl.cnf
error on line 282 of config file '/etc/openvpn/easy-rsa/openssl.cnf'
25472:error:0E065068:configuration file routines:STR_COPY:variable has no value:conf_def.c:629:line 282
Using configuration from /etc/openvpn/easy-rsa/openssl.cnf
error on line 282 of config file '/etc/openvpn/easy-rsa/openssl.cnf'
25473:error:0E065068:configuration file routines:STR_COPY:variable has no value:conf_def.c:629:line 282
cat: crl.pem: そのようなファイルやディレクトリはありません
client1.crt: /C=JP/ST=Kanagawa/L=Kawasaki/O=centossrv.com/CN=client1/emailAddress=root@centossrv.com
error 3 at 0 depth lookup:unable to get certificate CRL
[/c]
編集後は以下のようになります。
[c]
# For use with easy-rsa version 2.0 and OpenSSL 1.0.0*
# This definition stops the following lines choking if HOME isn't
# defined.
HOME = .
RANDFILE = $ENV::HOME/.rnd
openssl_conf = openssl_init
[ openssl_init ]
# Extra OBJECT IDENTIFIER info:
#oid_file = $ENV::HOME/.oid
oid_section = new_oids
engines = engine_section
# To use this configuration file with the "-extfile" option of the
# "openssl x509" utility, name here the section containing the
# X.509v3 extensions to use:
# extensions =
# (Alternatively, use a configuration file that has only
# X.509v3 extensions in its main [= default] section.)
[ new_oids ]
# We can add new OIDs in here for use by 'ca' and 'req'.
# Add a simple OID like this:
# testoid1=1.2.3.4
# Or use config file substitution like this:
# testoid2=${testoid1}.5.6
####################################################################
[ ca ]
default_ca = CA_default # The default ca section
####################################################################
[ CA_default ]
dir = $ENV::KEY_DIR # Where everything is kept
certs = $dir # Where the issued certs are kept
crl_dir = $dir # Where the issued crl are kept
database = $dir/index.txt # database index file.
new_certs_dir = $dir # default place for new certs.
certificate = $dir/ca.crt # The CA certificate
serial = $dir/serial # The current serial number
crl = $dir/crl.pem # The current CRL
private_key = $dir/ca.key # The private key
RANDFILE = $dir/.rand # private random number file
x509_extensions = usr_cert # The extentions to add to the cert
# Extensions to add to a CRL. Note: Netscape communicator chokes on V2 CRLs
# so this is commented out by default to leave a V1 CRL.
# crl_extensions = crl_ext
default_days = 3650 # how long to certify for
default_crl_days= 30 # how long before next CRL
default_md = md5 # use public key default MD
preserve = no # keep passed DN ordering
# A few difference way of specifying how similar the request should look
# For type CA, the listed attributes must be the same, and the optional
# and supplied fields are just that :-)
policy = policy_anything
# For the CA policy
[ policy_match ]
countryName = match
stateOrProvinceName = match
organizationName = match
organizationalUnitName = optional
commonName = supplied
name = optional
emailAddress = optional
# For the 'anything' policy
# At this point in time, you must list all acceptable 'object'
# types.
[ policy_anything ]
countryName = optional
stateOrProvinceName = optional
localityName = optional
organizationName = optional
organizationalUnitName = optional
commonName = supplied
name = optional
emailAddress = optional
####################################################################
[ req ]
default_bits = $ENV::KEY_SIZE
default_keyfile = privkey.pem
distinguished_name = req_distinguished_name
attributes = req_attributes
x509_extensions = v3_ca # The extentions to add to the self signed cert
# Passwords for private keys if not present they will be prompted for
# input_password = secret
# output_password = secret
# This sets a mask for permitted string types. There are several options.
# default: PrintableString, T61String, BMPString.
# pkix : PrintableString, BMPString (PKIX recommendation after 2004).
# utf8only: only UTF8Strings (PKIX recommendation after 2004).
# nombstr : PrintableString, T61String (no BMPStrings or UTF8Strings).
# MASK:XXXX a literal mask value.
string_mask = nombstr
# req_extensions = v3_req # The extensions to add to a certificate request
[ req_distinguished_name ]
countryName = Country Name (2 letter code)
countryName_default = $ENV::KEY_COUNTRY
countryName_min = 2
countryName_max = 2
stateOrProvinceName = State or Province Name (full name)
stateOrProvinceName_default = $ENV::KEY_PROVINCE
localityName = Locality Name (eg, city)
localityName_default = $ENV::KEY_CITY
0.organizationName = Organization Name (eg, company)
0.organizationName_default = $ENV::KEY_ORG
# we can do this but it is not needed normally :-)
#1.organizationName = Second Organization Name (eg, company)
#1.organizationName_default = World Wide Web Pty Ltd
organizationalUnitName = Organizational Unit Name (eg, section)
#organizationalUnitName_default =
commonName = Common Name (eg, your name or your server\'s hostname)
commonName_max = 64
name = Name
name_max = 64
emailAddress = Email Address
emailAddress_default = $ENV::KEY_EMAIL
emailAddress_max = 40
# JY -- added for batch mode
organizationalUnitName_default = $ENV::KEY_OU
commonName_default = $ENV::KEY_CN
name_default = $ENV::KEY_NAME
# SET-ex3 = SET extension number 3
[ req_attributes ]
challengePassword = A challenge password
challengePassword_min = 4
challengePassword_max = 20
unstructuredName = An optional company name
[ usr_cert ]
# These extensions are added when 'ca' signs a request.
# This goes against PKIX guidelines but some CAs do it and some software
# requires this to avoid interpreting an end user certificate as a CA.
basicConstraints=CA:FALSE
# Here are some examples of the usage of nsCertType. If it is omitted
# the certificate can be used for anything *except* object signing.
# This is OK for an SSL server.
# nsCertType = server
# For an object signing certificate this would be used.
# nsCertType = objsign
# For normal client use this is typical
# nsCertType = client, email
# and for everything including object signing:
# nsCertType = client, email, objsign
# This is typical in keyUsage for a client certificate.
# keyUsage = nonRepudiation, digitalSignature, keyEncipherment
# This will be displayed in Netscape's comment listbox.
nsComment = "Easy-RSA Generated Certificate"
# PKIX recommendations harmless if included in all certificates.
subjectKeyIdentifier=hash
authorityKeyIdentifier=keyid,issuer:always
extendedKeyUsage=clientAuth
keyUsage = digitalSignature
# This stuff is for subjectAltName and issuerAltname.
# Import the email address.
# subjectAltName=email:copy
# Copy subject details
# issuerAltName=issuer:copy
#nsCaRevocationUrl = http://www.domain.dom/ca-crl.pem
#nsBaseUrl
#nsRevocationUrl
#nsRenewalUrl
#nsCaPolicyUrl
#nsSslServerName
[ server ]
# JY ADDED -- Make a cert with nsCertType set to "server"
basicConstraints=CA:FALSE
nsCertType = server
nsComment = "Easy-RSA Generated Server Certificate"
subjectKeyIdentifier=hash
authorityKeyIdentifier=keyid,issuer:always
extendedKeyUsage=serverAuth
keyUsage = digitalSignature, keyEncipherment
[ v3_req ]
# Extensions to add to a certificate request
basicConstraints = CA:FALSE
keyUsage = nonRepudiation, digitalSignature, keyEncipherment
[ v3_ca ]
# Extensions for a typical CA
# PKIX recommendation.
subjectKeyIdentifier=hash
authorityKeyIdentifier=keyid:always,issuer:always
# This is what PKIX recommends but some broken software chokes on critical
# extensions.
#basicConstraints = critical,CA:true
# So we do this instead.
basicConstraints = CA:true
# Key usage: this is typical for a CA certificate. However since it will
# prevent it being used as an test self-signed certificate it is best
# left out by default.
# keyUsage = cRLSign, keyCertSign
# Some might want this also
# nsCertType = sslCA, emailCA
# Include email address in subject alt name: another PKIX recommendation
# subjectAltName=email:copy
# Copy issuer details
# issuerAltName=issuer:copy
# DER hex encoding of an extension: beware experts only!
# obj=DER:02:03
# Where 'obj' is a standard or added object
# You can even override a supported extension:
# basicConstraints= critical, DER:30:03:01:01:FF
[ crl_ext ]
# CRL extensions.
# Only issuerAltName and authorityKeyIdentifier make any sense in a CRL.
# issuerAltName=issuer:copy
authorityKeyIdentifier=keyid:always,issuer:always
[ engine_section ]
#
# If you are using PKCS#11
# Install engine_pkcs11 of opensc (www.opensc.org)
# And uncomment the following
# verify that dynamic_path points to the correct location
#
#pkcs11 = pkcs11_section
#[ pkcs11_section ]
#engine_id = pkcs11
#dynamic_path = /usr/lib/engines/engine_pkcs11.so
#MODULE_PATH = $ENV::PKCS11_MODULE_PATH
#PIN = $ENV::PKCS11_PIN
#init = 0
[/c]
ダミーのクライアント証明書廃止
[c]
# ./revoke-full dmy
Using configuration from /etc/openvpn/easy-rsa/openssl.cnf
Revoking Certificate 0B.
Data Base Updated
Using configuration from /etc/openvpn/easy-rsa/openssl.cnf
dmy.crt: /C=JP/ST=Tokyo/L=Shibuya/O=logw.jp/CN=dmy/emailAddress=contact@logw.jp
error 23 at 0 depth lookup:certificate revoked
#cp keys/crl.pem /etc/openvpn/ ← 証明書廃止リストをOpenVPN設定ファイル格納ディレクトリへコピー
#cd ← 証明書/鍵作成用ディレクトリを抜ける
[/c]
OpenVPN設定
[c]
# openvpn --genkey --secret /etc/openvpn/ta.key ← TLS認証鍵をOpenVPN設定ファイル格納ディレクトリへ作成
# cp /usr/share/doc/openvpn-*/sample-config-files/server.conf /etc/openvpn/ ← OpenVPN設定ファイルをサンプルよりコピー
[/c]
OpenVPN設定ファイル編集
[c]
# vi /etc/openvpn/server.confdev tun ← VPNインタフェースとしてTUNを指定(デフォルト)
server 10.8.0.0 255.255.255.0 ← VPNクライアント割当てアドレス範囲として10.8.0.0/24を指定(デフォルト)
;push "route 192.168.10.0 255.255.255.0"
;push "route 192.168.20.0 255.255.255.0"
push "route xxx.xxx.xxx.0 255.255.255.0" ← 追加(LAN(例:192.168.1.0/24)へのルートをVPNサーバー経由にする)
tls-auth ta.key 0 # This file is secret ← 行頭の;を削除してコメント解除(TLS認証有効化)
user nobody ← 行頭の;を削除してコメント解除(OpenVPN実行権限を下げる)
group nobody ← 行頭の;を削除してコメント解除(OpenVPN実行権限を下げる)
log-append /var/log/openvpn.log ← 行頭の;を削除してコメント解除(ログを/var/log/openvpn.logに記録する)
management localhost 7505 ← 最終行へ追加(管理インタフェースの有効化※後述)
crl-verify crl.pem ← 最終行へ追加(証明書廃止リストの有効化)
[/c]
設定すると以下のようになります。
[c]
#################################################
# Sample OpenVPN 2.0 config file for #
# multi-client server. #
# #
# This file is for the server side #
# of a many-clients one-server #
# OpenVPN configuration. #
# #
# OpenVPN also supports #
# single-machine single-machine #
# configurations (See the Examples page #
# on the web site for more info). #
# #
# This config should work on Windows #
# or Linux/BSD systems. Remember on #
# Windows to quote pathnames and use #
# double backslashes, e.g.: #
# "C:\\Program Files\\OpenVPN\\config\\foo.key" #
# #
# Comments are preceded with '#' or ';' #
#################################################
# Which local IP address should OpenVPN
# listen on? (optional)
;local a.b.c.d
# Which TCP/UDP port should OpenVPN listen on?
# If you want to run multiple OpenVPN instances
# on the same machine, use a different port
# number for each one. You will need to
# open up this port on your firewall.
port 1194
# TCP or UDP server?
;proto tcp
proto udp
# "dev tun" will create a routed IP tunnel,
# "dev tap" will create an ethernet tunnel.
# Use "dev tap0" if you are ethernet bridging
# and have precreated a tap0 virtual interface
# and bridged it with your ethernet interface.
# If you want to control access policies
# over the VPN, you must create firewall
# rules for the the TUN/TAP interface.
# On non-Windows systems, you can give
# an explicit unit number, such as tun0.
# On Windows, use "dev-node" for this.
# On most systems, the VPN will not function
# unless you partially or fully disable
# the firewall for the TUN/TAP interface.
;dev tap
dev tun
# Windows needs the TAP-Win32 adapter name
# from the Network Connections panel if you
# have more than one. On XP SP2 or higher,
# you may need to selectively disable the
# Windows firewall for the TAP adapter.
# Non-Windows systems usually don't need this.
;dev-node MyTap
# SSL/TLS root certificate (ca), certificate
# (cert), and private key (key). Each client
# and the server must have their own cert and
# key file. The server and all clients will
# use the same ca file.
#
# See the "easy-rsa" directory for a series
# of scripts for generating RSA certificates
# and private keys. Remember to use
# a unique Common Name for the server
# and each of the client certificates.
#
# Any X509 key management system can be used.
# OpenVPN can also use a PKCS #12 formatted key file
# (see "pkcs12" directive in man page).
ca ca.crt
cert server.crt
key server.key # This file should be kept secret
# Diffie hellman parameters.
# Generate your own with:
# openssl dhparam -out dh1024.pem 1024
# Substitute 2048 for 1024 if you are using
# 2048 bit keys.
dh dh1024.pem
# Configure server mode and supply a VPN subnet
# for OpenVPN to draw client addresses from.
# The server will take 10.8.0.1 for itself,
# the rest will be made available to clients.
# Each client will be able to reach the server
# on 10.8.0.1. Comment this line out if you are
# ethernet bridging. See the man page for more info.
server 10.8.0.0 255.255.255.0
# Maintain a record of client virtual IP address
# associations in this file. If OpenVPN goes down or
# is restarted, reconnecting clients can be assigned
# the same virtual IP address from the pool that was
# previously assigned.
ifconfig-pool-persist ipp.txt
# Configure server mode for ethernet bridging.
# You must first use your OS's bridging capability
# to bridge the TAP interface with the ethernet
# NIC interface. Then you must manually set the
# IP/netmask on the bridge interface, here we
# assume 10.8.0.4/255.255.255.0. Finally we
# must set aside an IP range in this subnet
# (start=10.8.0.50 end=10.8.0.100) to allocate
# to connecting clients. Leave this line commented
# out unless you are ethernet bridging.
;server-bridge 10.8.0.4 255.255.255.0 10.8.0.50 10.8.0.100
# Configure server mode for ethernet bridging
# using a DHCP-proxy, where clients talk
# to the OpenVPN server-side DHCP server
# to receive their IP address allocation
# and DNS server addresses. You must first use
# your OS's bridging capability to bridge the TAP
# interface with the ethernet NIC interface.
# Note: this mode only works on clients (such as
# Windows), where the client-side TAP adapter is
# bound to a DHCP client.
;server-bridge
# Push routes to the client to allow it
# to reach other private subnets behind
# the server. Remember that these
# private subnets will also need
# to know to route the OpenVPN client
# address pool (10.8.0.0/255.255.255.0)
# back to the OpenVPN server.
;push "route 192.168.10.0 255.255.255.0"
;push "route 192.168.20.0 255.255.255.0"
push "route 49.212.167.84 255.255.254.0"
# To assign specific IP addresses to specific
# clients or if a connecting client has a private
# subnet behind it that should also have VPN access,
# use the subdirectory "ccd" for client-specific
# configuration files (see man page for more info).
# EXAMPLE: Suppose the client
# having the certificate common name "Thelonious"
# also has a small subnet behind his connecting
# machine, such as 192.168.40.128/255.255.255.248.
# First, uncomment out these lines:
;client-config-dir ccd
;route 192.168.40.128 255.255.255.248
# Then create a file ccd/Thelonious with this line:
# iroute 192.168.40.128 255.255.255.248
# This will allow Thelonious' private subnet to
# access the VPN. This example will only work
# if you are routing, not bridging, i.e. you are
# using "dev tun" and "server" directives.
# EXAMPLE: Suppose you want to give
# Thelonious a fixed VPN IP address of 10.9.0.1.
# First uncomment out these lines:
;client-config-dir ccd
;route 10.9.0.0 255.255.255.252
# Then add this line to ccd/Thelonious:
# ifconfig-push 10.9.0.1 10.9.0.2
# Suppose that you want to enable different
# firewall access policies for different groups
# of clients. There are two methods:
# (1) Run multiple OpenVPN daemons, one for each
# group, and firewall the TUN/TAP interface
# for each group/daemon appropriately.
# (2) (Advanced) Create a script to dynamically
# modify the firewall in response to access
# from different clients. See man
# page for more info on learn-address script.
;learn-address ./script
# If enabled, this directive will configure
# all clients to redirect their default
# network gateway through the VPN, causing
# all IP traffic such as web browsing and
# and DNS lookups to go through the VPN
# (The OpenVPN server machine may need to NAT
# or bridge the TUN/TAP interface to the internet
# in order for this to work properly).
;push "redirect-gateway def1 bypass-dhcp"
# Certain Windows-specific network settings
# can be pushed to clients, such as DNS
# or WINS server addresses. CAVEAT:
# http://openvpn.net/faq.html#dhcpcaveats
# The addresses below refer to the public
# DNS servers provided by opendns.com.
;push "dhcp-option DNS 208.67.222.222"
;push "dhcp-option DNS 208.67.220.220"
# Uncomment this directive to allow different
# clients to be able to "see" each other.
# By default, clients will only see the server.
# To force clients to only see the server, you
# will also need to appropriately firewall the
# server's TUN/TAP interface.
;client-to-client
# Uncomment this directive if multiple clients
# might connect with the same certificate/key
# files or common names. This is recommended
# only for testing purposes. For production use,
# each client should have its own certificate/key
# pair.
#
# IF YOU HAVE NOT GENERATED INDIVIDUAL
# CERTIFICATE/KEY PAIRS FOR EACH CLIENT,
# EACH HAVING ITS OWN UNIQUE "COMMON NAME",
# UNCOMMENT THIS LINE OUT.
;duplicate-cn
# The keepalive directive causes ping-like
# messages to be sent back and forth over
# the link so that each side knows when
# the other side has gone down.
# Ping every 10 seconds, assume that remote
# peer is down if no ping received during
# a 120 second time period.
keepalive 10 120
# For extra security beyond that provided
# by SSL/TLS, create an "HMAC firewall"
# to help block DoS attacks and UDP port flooding.
#
# Generate with:
# openvpn --genkey --secret ta.key
#
# The server and each client must have
# a copy of this key.
# The second parameter should be '0'
# on the server and '1' on the clients.
tls-auth ta.key 0 # This file is secret
# Select a cryptographic cipher.
# This config item must be copied to
# the client config file as well.
;cipher BF-CBC # Blowfish (default)
;cipher AES-128-CBC # AES
;cipher DES-EDE3-CBC # Triple-DES
# Enable compression on the VPN link.
# If you enable it here, you must also
# enable it in the client config file.
comp-lzo
# The maximum number of concurrently connected
# clients we want to allow.
;max-clients 100
# It's a good idea to reduce the OpenVPN
# daemon's privileges after initialization.
#
# You can uncomment this out on
# non-Windows systems.
user nobody
group nobody
# The persist options will try to avoid
# accessing certain resources on restart
# that may no longer be accessible because
# of the privilege downgrade.
persist-key
persist-tun
# Output a short status file showing
# current connections, truncated
# and rewritten every minute.
status openvpn-status.log
# By default, log messages will go to the syslog (or
# on Windows, if running as a service, they will go to
# the "\Program Files\OpenVPN\log" directory).
# Use log or log-append to override this default.
# "log" will truncate the log file on OpenVPN startup,
# while "log-append" will append to it. Use one
# or the other (but not both).
;log openvpn.log
log-append /var/log/openvpn.log
# Set the appropriate level of log
# file verbosity.
#
# 0 is silent, except for fatal errors
# 4 is reasonable for general usage
# 5 and 6 can help to debug connection problems
# 9 is extremely verbose
verb 3
# Silence repeating messages. At most 20
# sequential messages of the same message
# category will be output to the log.
;mute 20
management localhost 7505
crl-verify crl.pem
[/c]
VPNインタフェース用ファイアウォール自動設定
[c]
# vi /etc/openvpn/openvpn-startup ← OpenVPN起動時実行スクリプト新規作成
[/c]
[c]
#!/bin/bash
# VPNインタフェースiptablesルール削除スクリプト実行※必須
/etc/openvpn/openvpn-shutdown
# VPNサーバーからの送信を許可※必須
iptables -I OUTPUT -o tun+ -j ACCEPT
iptables -I FORWARD -o tun+ -j ACCEPT
# VPNクライアントからVPNサーバーへのアクセスを許可する場合
iptables -I INPUT -i tun+ -j ACCEPT
# VPNクライアントからLANへのアクセスを許可する場合
# (例としてVPNクライアントから192.168.1.0/24へのアクセスを許可する場合)
# ※192.168.1.0/24側のファイアウォール等でVPNクライアント(10.8.0.0/24)からのアクセスを許可すること
iptables -I FORWARD -i tun+ -d 192.168.1.0/24 -j ACCEPT
# VPNクライアントからLAN内特定マシンのみへのアクセスを許可する場合
# (例としてVPNクライアントから192.168.1.3へのアクセスを許可する場合)
# ※192.168.1.3側のファイアウォール等でVPNクライアント(10.8.0.0/24)からのアクセスを許可すること
iptables -I FORWARD -i tun+ -d 192.168.1.3 -j ACCEPT
chmod +x /etc/openvpn/openvpn-startup ← OpenVPN起動時実行スクリプトへ実行権限付加
[/c]
VPNインタフェース用ファイアウォール自動設定解除
[c]
# vi /etc/openvpn/openvpn-shutdown ← OpenVPN停止時実行スクリプト新規作成
#!/bin/bash
# VPNインタフェース(tun+)用iptablesルール削除関数
delete() {
rule_number=`iptables -L $target --line-numbers -n -v|grep tun.|awk '{print $1}'|sort -r`
for num in $rule_number
do
iptables -D $target $num
done
}
# VPNインタフェース(tun+)用iptables受信ルール削除
target='INPUT'
delete
# VPNインタフェース(tun+)用iptables転送ルール削除
target='FORWARD'
delete
# VPNインタフェース(tun+)用iptables送信ルール削除
target='OUTPUT'
delete
# chmod +x /etc/openvpn/openvpn-shutdown ← OpenVPN停止時実行スクリプトへ実行権限付加
[/c]
OpenVPNログローテーション設定
[c]
# vi /etc/logrotate.d/openvpn ← OpenVPNログローテーション設定ファイル新規作成
/var/log/openvpn.log {
missingok
notifempty
sharedscripts
postrotate
/etc/rc.d/init.d/openvpn restart 2>&1 > /dev/null || true
endscript
}
[/c]
OpenVPN起動(サーバー側)
[c]
# vi /etc/rc.d/init.d/openvpn ← OpenVPN起動スクリプト編集
echo 1 > /proc/sys/net/ipv4/ip_forward ← 行頭の#を削除してコメント解除(パケット転送有効化)
script_security="--script-security 2" ← OpenVPN起動時下記エラーメッセージ出力対処(「-」を「=」へ修正)
openvpn を起動中: /etc/rc.d/init.d/openvpn: line 169: script_security---script-security 2: command not found
[/c]
修正するとこんな感じになります。
[c]
#!/bin/sh
#
# openvpn This shell script takes care of starting and stopping
# openvpn on RedHat or other chkconfig-based system.
#
# chkconfig: - 24 76
#
# processname: openvpn
# description: OpenVPN is a robust and highly flexible tunneling \
# application that uses all of the encryption, \
# authentication, and certification features of the OpenSSL \
# library to securely tunnel IP networks over a single UDP \
# port.
# Contributed to the OpenVPN project by
### BEGIN INIT INFO
# Provides: openvpn
# Required-Start: $network
# Required-Stop: $network
# Short-Description: start and stop openvpn
# Description: OpenVPN is a robust and highly flexible tunneling \
# application that uses all of the encryption, \
# authentication, and certification features of the OpenSSL \
# library to securely tunnel IP networks over a single UDP \
# port.
### END INIT INFO
# Douglas Keller <doug@voidstar.dyndns.org>
# 2002.05.15
# To install:
# copy this file to /etc/rc.d/init.d/openvpn
# shell> chkconfig --add openvpn
# shell> mkdir /etc/openvpn
# make .conf or .sh files in /etc/openvpn (see below)
# To uninstall:
# run: chkconfig --del openvpn
# Author's Notes:
#
# I have created an /etc/init.d init script and enhanced openvpn.spec to
# automatically register the init script. Once the RPM is installed you
# can start and stop OpenVPN with "service openvpn start" and "service
# openvpn stop".
#
# The init script does the following:
#
# - Starts an openvpn process for each .conf file it finds in
# /etc/openvpn.
#
# - If /etc/openvpn/xxx.sh exists for a xxx.conf file then it executes
# it before starting openvpn (useful for doing openvpn --mktun...).
#
# - In addition to start/stop you can do:
#
# service openvpn reload - SIGHUP
# service openvpn reopen - SIGUSR1
# service openvpn status - SIGUSR2
#
# Modifications:
#
# 2003.05.02
# * Changed == to = for sh compliance (Bishop Clark).
# * If condrestart|reload|reopen|status, check that we were
# actually started (James Yonan).
# * Added lock, piddir, and work variables (James Yonan).
# * If start is attempted twice, without an intervening stop, or
# if start is attempted when previous start was not properly
# shut down, then kill any previously started processes, before
# commencing new start operation (James Yonan).
# * Do a better job of flagging errors on start, and properly
# returning success or failure status to caller (James Yonan).
#
# 2005.04.04
# * Added openvpn-startup and openvpn-shutdown script calls
# (James Yonan).
#
# Location of openvpn binary
openvpn=""
openvpn_locations="/usr/sbin/openvpn /usr/local/sbin/openvpn"
for location in $openvpn_locations
do
if [ -f "$location" ]
then
openvpn=$location
fi
done
# Lockfile
lock="/var/lock/subsys/openvpn"
# PID directory
piddir="/var/run/openvpn"
# Our working directory
work=/etc/openvpn
# Source function library.
. /etc/rc.d/init.d/functions
# Source networking configuration.
. /etc/sysconfig/network
# Check that networking is up.
if [ ${NETWORKING} = "no" ]
then
echo "Networking is down"
exit 0
fi
# Check that binary exists
if ! [ -f $openvpn ]
then
echo "openvpn binary not found"
exit 0
fi
# See how we were called.
case "$1" in
start)
echo -n $"Starting openvpn: "
/sbin/modprobe tun >/dev/null 2>&1
# From a security perspective, I think it makes
# sense to remove this, and have users who need
# it explictly enable in their --up scripts or
# firewall setups.
echo 1 > /proc/sys/net/ipv4/ip_forward
# Run startup script, if defined
if [ -f $work/openvpn-startup ]; then
$work/openvpn-startup
fi
if [ ! -d $piddir ]; then
mkdir $piddir
fi
if [ -f $lock ]; then
# we were not shut down correctly
for pidf in `/bin/ls $piddir/*.pid 2>/dev/null`; do
if [ -s $pidf ]; then
kill `cat $pidf` >/dev/null 2>&1
fi
rm -f $pidf
done
rm -f $lock
sleep 2
fi
rm -f $piddir/*.pid
cd $work
# Start every .conf in $work and run .sh if exists
errors=0
successes=0
for c in `/bin/ls *.conf 2>/dev/null`; do
bn=${c%%.conf}
if [ -f "$bn.sh" ]; then
. ./$bn.sh
fi
rm -f $piddir/$bn.pid
# Handle backward compatibility, see Red Hat Bugzilla ID #458594
script_security=''
if [ -z "$( grep '^[[:space:]]*script-security[[:space:]]' $c )" ]; then
script_security="--script-security 2"
fi
$openvpn --daemon --writepid $piddir/$bn.pid --config $c --cd $work $script_security
if [ $? = 0 ]; then
successes=1
else
errors=1
fi
done
if [ $errors = 1 ]; then
failure; echo
else
success; echo
fi
if [ $successes = 1 ]; then
touch $lock
fi
;;
stop)
echo -n $"Shutting down openvpn: "
for pidf in `/bin/ls $piddir/*.pid 2>/dev/null`; do
if [ -s $pidf ]; then
kill `cat $pidf` >/dev/null 2>&1
fi
rm -f $pidf
done
# Run shutdown script, if defined
if [ -f $work/openvpn-shutdown ]; then
$work/openvpn-shutdown
fi
success; echo
rm -f $lock
;;
restart)
$0 stop
sleep 2
$0 start
;;
reload)
if [ -f $lock ]; then
for pidf in `/bin/ls $piddir/*.pid 2>/dev/null`; do
if [ -s $pidf ]; then
kill -HUP `cat $pidf` >/dev/null 2>&1
fi
done
else
echo "openvpn: service not started"
exit 1
fi
;;
reopen)
if [ -f $lock ]; then
for pidf in `/bin/ls $piddir/*.pid 2>/dev/null`; do
if [ -s $pidf ]; then
kill -USR1 `cat $pidf` >/dev/null 2>&1
fi
done
else
echo "openvpn: service not started"
exit 1
fi
;;
condrestart)
if [ -f $lock ]; then
$0 stop
# avoid race
sleep 2
$0 start
fi
;;
status)
if [ -f $lock ]; then
for pidf in `/bin/ls $piddir/*.pid 2>/dev/null`; do
if [ -s $pidf ]; then
kill -USR2 `cat $pidf` >/dev/null 2>&1
fi
done
echo "Status written to /var/log/messages"
else
echo "openvpn: service not started"
exit 1
fi
;;
*)
echo "Usage: openvpn {start|stop|restart|condrestart|reload|reopen|status}"
exit 1
;;
esac
exit 0
[/c]
OpenVPN起動
[c]
/etc/rc.d/init.d/openvpn start
[/c]
ファイアウォール設定
- ルーター側で、UDPの1194番ポートへのアクセスをサーバーに転送するようにする。
- サーバー側で、UDPの1194番ポートへのアクセスを許可するようにする。
クライアントに必要な設定ファイルをローカルにダウンロード
OpenVPNはSSL通信をしたり、証明書を使って認証するため、サーバーからクライアントの証明書などを持ってきてクライアントソフトをインストール下後に使います。今回は必要な証明書などを先にローカルにダウンロードします。
クライアントに必要な設定ファイル
必要なファイルは以下になります。
- CA証明書(/etc/openvpn/ca.crt)
- クライアント証明書(/etc/openvpn/easy-rsa/keys/client1.crt)
- クライアント秘密鍵(/etc/openvpn/easy-rsa/keys/client1.key)
- TLS認証鍵(/etc/openvpn/ta.key)
ユーザーのディレクトリへコピー
証明書などはSFTPを使ってユーザーのホームディレクトリからローカルへダウンロードしたいと思います。そのため、SSHにてroot権限で必要な証明書をコピーして所有者とグループを切り替えたいと思います。
- ホームディレクトリ:/home/logw
- 所有者:logw
- グループ:logw
という設定にしたいと思います。
ホームディレクトリに証明書を格納するディレクトリを作成
[c]
# mkdir /home/logw/certificate
[/c]
CA証明書をコピー
[c]
cp /etc/openvpn/ca.crt /home/logw/certificate
[/c]
クライアント証明書をコピー
[c]
cp /etc/openvpn/easy-rsa/keys/client1.crt /home/logw/certificate
[/c]
TLS認証鍵をコピー
[c]
cp /etc/openvpn/ta.key /home/logw/certificate
[/c]
クライアント秘密鍵をコピー
[c]
cp /etc/openvpn/easy-rsa/keys/client1.key /home/logw/certificate
[/c]
所有者、グループの変更
コピーしただけだと所有者やグループが「root」のままなのでダウンロードできません。そこで所有者とグループを変更します。
[c]
chown -R logw:logw /home/logw/certificate
[/c]
これで所有者が変更となります。後はSFTPでログインしてcertificateディレクトリをローカルにコピーしてください。
OpenVPNインストール(クライアント側)
OpenVPN.JP 日本語情報サイトよりOpenVPN GUI for Windows 日本語版をインストールしてください。
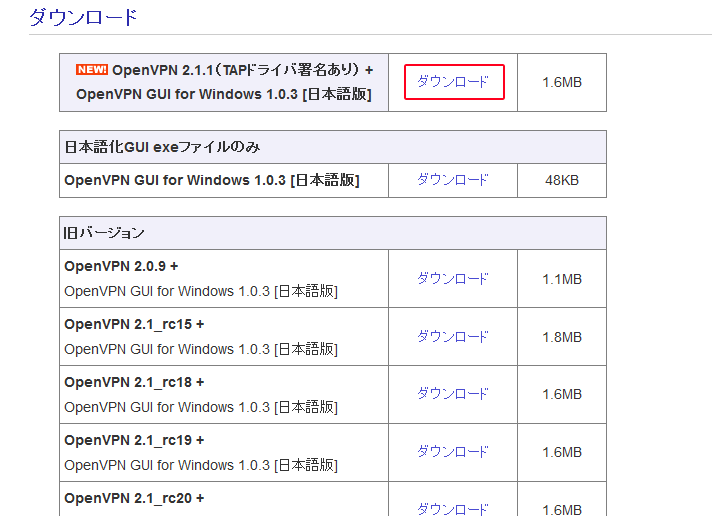
※クリックで拡大します。
最新版をダウンロードします。デスクトップでダブルクリックしてください。
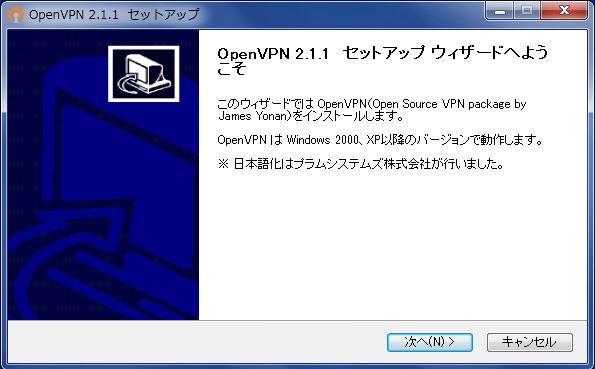
次へを押して下さい
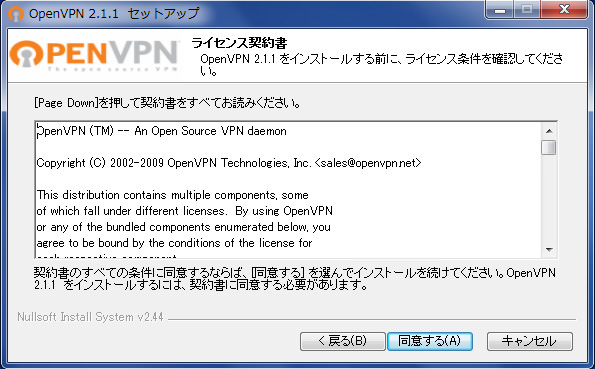
次へを押して下さい

次へを押して下さい

次へを押して下さい
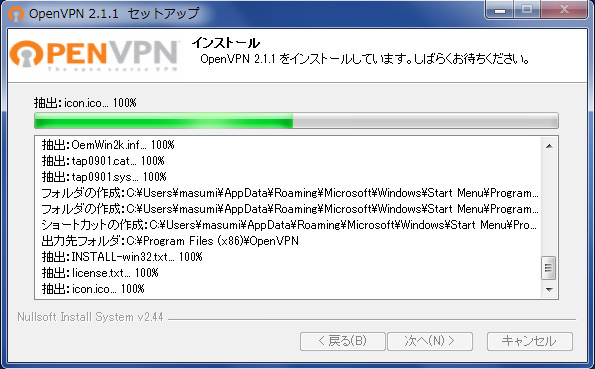
インストール中になります
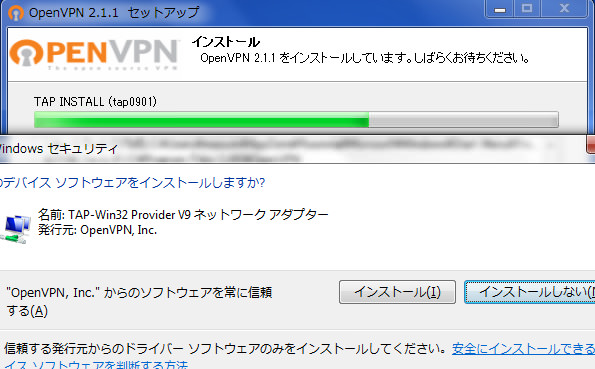
ネットワークアダプタをインストールして下さい
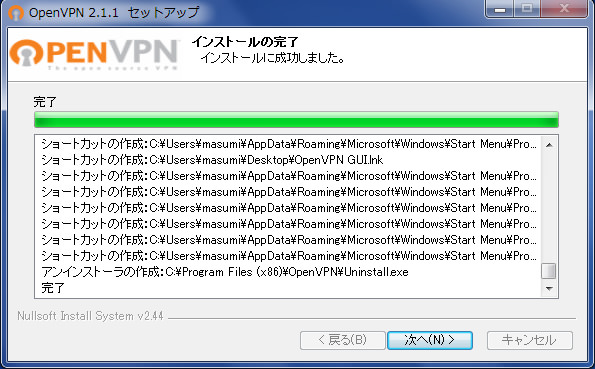
インストール完了です
![]()
左端の赤いアイコンが「切断状態」になります。接続をすると緑色になります。
備考
インストールして成功したのですが、この後どうすればいいのかなと・・・
追記
接続が成功して緑色になるとローカルIPを取得します。
※10.8.0.5または6などになります。
IPを取得したらWindowsクライアントの場合はコマンドプロンプトから「ping 10.8.0.1」といれてみてください。pingが返ってこれば疎通できたことになります。
この記事に関する技術サポート・ご相談
「手順通りにいかない」「自社環境への構築を代行してほしい」など、
インフラ・サーバー周りでハマった際はお気軽にご相談ください。
※ Googleフォームへ移動します(初回相談無料)
個人支援・寄付について
サイトラボでは個人支援・寄付を受けております。ご協力いただける方はお願いいたします。当サイトではビットコインで受け付けております。
- ビットコイン:3LHnADwZwUbic2L45EnVJEykiG6KfbqrwS